 When I was considering housing for our pet rabbit, I did a lot of research on the internet, looking for ideas on designing a rabbit cage. A house rabbit condo seemed like the answer for allowing us to provide good rabbit care in a relatively small space. And if we were to find a companion rabbit for Priscilla, we would need much more room than in a conventional rabbit hutch.
After reading through all the links on and from the House Rabbit Society’s pages, it soon became clear that a bunny condo — or more specifically one built using NIC cubes — was the way to go. But the closer I examined the other pages, the more unanswered questions I found. For example: details on how to attach the back, sides and front to the floor, shelf supports, floor coverings, etc.
I decided to adopt the “learn by doing” principle. I build my first rabbit condo and solved, one way or another, all of the problems I hadn’t found answers to. Since then I have build two more rabbit condos. All are similar, but each one had a few refinements that made the successive ones better than the earlier models.
Most of the construction details are shown on my How to Build a Rabbit Condo video on YouTube.
Two things I felt needed further clarification most urgently, the pattern for cutting the base and three shelves out of one sheet of plywood, and the list of materials with prices, are already online.
This third and, hopefully, final page is meant to fill in all the blanks I can think of that remain.
Of course, the first think you need to do is decide how much room you need for all of the house rabbits that are going to live for up to 18 or 20 hours a day in the condo. Of course, even the best condo is no substitute for the free-run exercise time rabbits require — a bare minimum of four hours per day. They have to be let out in order to race the “Bunny 500″, do proper binkies, explore, chase one another, get into trouble, and do all the other things house rabbits love. But I digress…
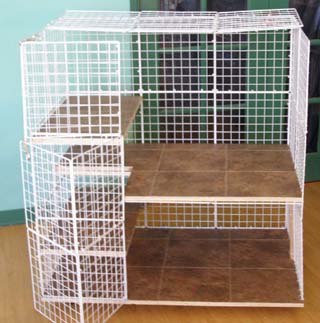
One design limitation is that the wire squares from which you’ll be building the condo are 14-inches square. That means that any dimension, whether the length, width, or depth, will have to be either 14-inches, 28-inches, 42, 56 or any other multiple of 14. I made all of mine 42-inches wide, 42-inches high and 28-inches deep. You could keep the same floor area but increase the height to 56-inches, I suppose, if you thought it would be better. Of course that would add to the expense. My size only requires two boxes of the wire squares.
Once you’ve settled on the size, all you need to do is take your materials list and plywood cutting plans to a good lumber yard, hardware store, or big box home center. We got everything in one stop at our local Home Depot.
Our base and three platforms were all cut from one sheet of 5/8″ plywood. I suppose maybe I could have used a thinner grade, but this seemed sturdier and the price wasn’t that much higher.
In addition to the price of the plywood, I paid an extra 50-cents per cut to have the four pieces cut to size, and they charged me an extra five bucks, but the guy did it perfectly, and I didn’t have to struggle getting a huge full sheet of plywood into the back of our little compact hatchback.
Once home, I used a hand-held circular saw to cut the 14″ x 14” notch out of the 2nd platform (see the blue X in the cutting diagram page).
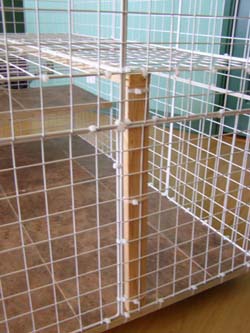
The only other cutting that needed to be done was to cut a 42-inch length of 1 x 2 as the horizontal support under the 2nd platform, and a shorter vertical 1 x 2 to brace it on one end. The length of this vertical 1 x 2 will depend on where you have attached your shelves.
On the last condo I made, the distance from the bottom of the base to the bottom of the first shelf is 9-inches. From the bottom of the base to the bottom of the big platform is 18-inches, and to the top platform is 28-inches. As a result, my vertical support is 16-inches long. Obviously, if your big platform is higher up, you’ll need a longer vertical support.
One modification I did on the last condo I built that’s not on the first two is an attachment for the horizontal support. I used a 1/4-inch bit to drill a hole about one inch in from the left (unsupported) side. Then, I ran a nylon cable tie through the hole and attached it to the left side of the condo. This adds a bit of extra stability. But I shouldn’t be getting ahead of myself.
I was talking about cutting the 1 x 2s. You don’t actually need to do that for a while. What I would advise doing first is attaching the vinyl tiles to the base and three platforms. That’s because the adhesive needs a good 24-hours to cure. In one of my condos I made a mistake with that. After attaching the peel-and-stick tiles to the plywood, I stacked the shelves against a wall. A few hours later, half of the tiles had slid off and I had to glue them back on. Afterwards, I always remembered to keep them lying flat, one on top of another, with some weight on top, and they never fell off anymore.
Picking out the vinyl tiles is important. You can get cheap ones and more expensive ones. I found that not only do the cheaper ones tend to crack and break more easily, they also tend to be too slippery. And that’s not good for little rabbit feet that were made for hopping on earth and grass. Even though we have covered most of the flooring in our condo with cheap, small, washable rugs, we still are glad we paid extra and got tiles that provide better traction.
Some people have covered their plywood with remnants of linoleum. I looked for that and couldn’t find it easily. Likely it’s a cheaper solution if you can get it, but possibly more difficult to attach than peel-and-stick tiles.
If there are two of you, I’d recommend having one start joining wire squares together while the other tiles the plywood.
For my size condo, the two sides require six panels each, arranged two squares deep and three squares high.
The back uses nine squares — three by three.
The top is the same as the sides — two by three. But how you attach the top panels should depend on how you want the top to be. If, as in the video, it’s hinged in the middle and the front half flips open, then the two halves should not be attached as tightly as if the top were meant to be solid.
 If you plan on never opening the top, but only gaining access through the front, then you can “double-cross” some of the corners in the top, as I showed in the video, for extra rigidity.
Finally, the front will use nine panels, just like the back. And, just like with the top, the way you join the front panels should be based on which ones you want to be rigid, and which ones you want to be hinged. On our condo, the left third, one panel wide and three panels high, if firmly attached at the bottom and left side only. The center and right thirds are what make the “front door”, that swings open to the left.
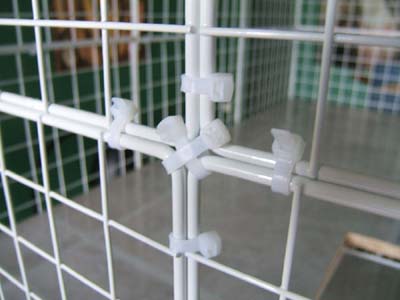
I’ve been asked about how to tighten the nylon cable ties. I’ve got pretty strong hands and fingers and don’t use tools. But if you need some help, then I’d recommend using two pairs of standard pliers. After looping the tie through two panels and then poking the pointed end of the tie through the hole, pull the end by holding it with pliers while holding the square part firm with the other pliers. Keep pulling until the clicking sound stops.
At first I cut the loose ends off using side-cutters. Later I learned there’s a better tool that allows you to cut even closer and reduce the risk of sharp ends sticking out and possibly scratching your bunnies. I bought one online, and I think it was called a “CABLE-TIE FLUSH CUTTER“.
When you’re attaching the cable ties, work from the outside, so if there are any sharp, pointy bits sticking out, they’ll be on the outside and not on the inside where they may injure little bunnies.
I did a good bit of the work attaching the panels by myself, and I found it could be done with only two hands if I had a bit of help. First, when attaching the completed left side panel to the completed back panel, for example, I’d put the back panel on a table. Next, I’d utilize some of those snap fasteners that eventually will be used to latch the top and front door. Use a couple of them to temporarily hold the side panel to the back panel while you attach the first couple of nylon ties. I found this method really saved a lot of time and frustration, and I regret that I didn’t show it in the video.
Where it really helps to have an extra set of hands is when, after you have the back, sides, and one-third of the front all attached, and you set it onto the base. If you have to do it all by yourself, I’d suggest leaning the back against a wall, or something like that.
In the video, you see me using a marking pen on the outside of the wire panels where the holes will be drilled to join the panels to the base. What you couldn’t see is that I actually drilled the holes a bit farther away from the edges. That’s because, when you look at how the panels are joined to the base, you’ll see that the wire panels are actually outside of the holes, not inside.
The last time Robert and Mary assembled a condo, we took all the completed components — the base, platforms, sides, back, top, front and panel supports — over to somebody else’s house and did the final assembly there. It took about an hour.
It was only when we were building the 3rd condo that we thought to count how many nylon cable ties were required. The total number was about 350 — including a few that were wasted by mistake. If you’re making one the same size as ours, I’d say you should buy a minimum of 400. If you shop where we did, you’ll probably find it’s cheaper to buy 1,000 of them than to buy 400.
That’s all I can think of. If I’ve missed any points, please leave a comment and I’ll do my best to help.
Finally, here’s what’s currently inside Priscilla and Red’s condo:
- 6 small (22″ x 38″) cotton rugs. We bought a dozen at Ikea for $2.99 each. Folded lengthwise, they make nice, washable, liners for the two small shelves.
- One water bowl
- One litter box lined with newspaper, wood pellets and timothy hay.
- A couple of round, brown, berry-like objects
- But no rabbits right now. They’re sleeping behind their favorite chair.
NOTE: This was written more than five years ago. Red and Priscilla are now across the Rainbow Bridge.


